iPhoneアプリのUIBarButtonItemやUITabBarItemで画像の輪郭以外を表示させる方法
iOSのUIBarButtonItem(UINavigationBar)やUITabBarItem(UITabBar)でカスタム画像を使用すると、輪郭のみの画像になることがあります。
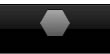
たとえば次の画像を使用すると

輪郭のみになります。
これはiOSのリファレンスにも書かれています。
iOS Developper LibraryのUIBarButtonItem Class Reference
The item’s image. If nil an image is not displayed. The images displayed on the bar are derived from this image. If this image is too large to fit on the bar, it is scaled to fit. Typically, the size of a toolbar and navigation bar image is 20 x 20 points. The alpha values in the source image are used to create the images-opaque values are ignored.
つまり表示される画像は透明部分(alpha値 < 1.0)のみで、不透明な部分は無視されます。
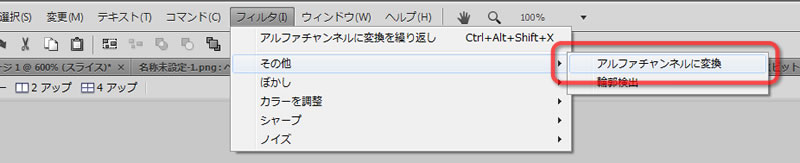
輪郭以外を表示させるには画像全体をアルファチャンネルに変換して、全体の透明度を変更します。
これで変換された画像は下のものになり、

輪郭以外も表示されるようになります。

全体をアルファチャンネル変換すると、全体的に色が薄くなってしまうので、輪郭内のパーツのみアルファ変換したほうがいいです。
関連記事
- iPhoneアプリを作成する(Hello World)
- 古いバージョンのXcodeやiOS SDKを入手する方法
- [暗号化]ブロック暗号とは(AES/DES/Blowfish PKCS5Padding ECB/CBC IV)
- iPhoneアプリやAndroidアプリを簡単に作成する方法 ハイブリッドアプリケーション
スポンサーリンク